With MyCashflow's campaigns, you can offer your online store customers product and quantity-based, discount lines and free shipping. Below, we will go through how campaigns are managed and what different kind of discounts you can offer.
Campaigns allow you to create the following types of discounts in your store:
- Product discounts apply to the products selected for the campaign regardless of other purchases.
- Quantity-based discounts offer a lower total price if the customer orders several items of the same product.
- Discount line gives the customer a percentage or euro discount on the total price of the products you specify or the order total.
- Free delivery means that the customer does not have to pay shipping costs. You can set a minimum order amount and choose the shipping methods that are covered by the campaign.
Besides campaigns, you can also offer your customers coupon discounts and gift cards.
The new discount campaign tools
MyCashflow is now equipped with new discount campaign tools that expand the functionality of the previous campaign types and will eventually replace them.
You can create a campaign page for product discounts in your online store to list the discounted products. You can also include a campaign image and promotional text in the page. With the default theme, the campaign pages can be found in the main menu.
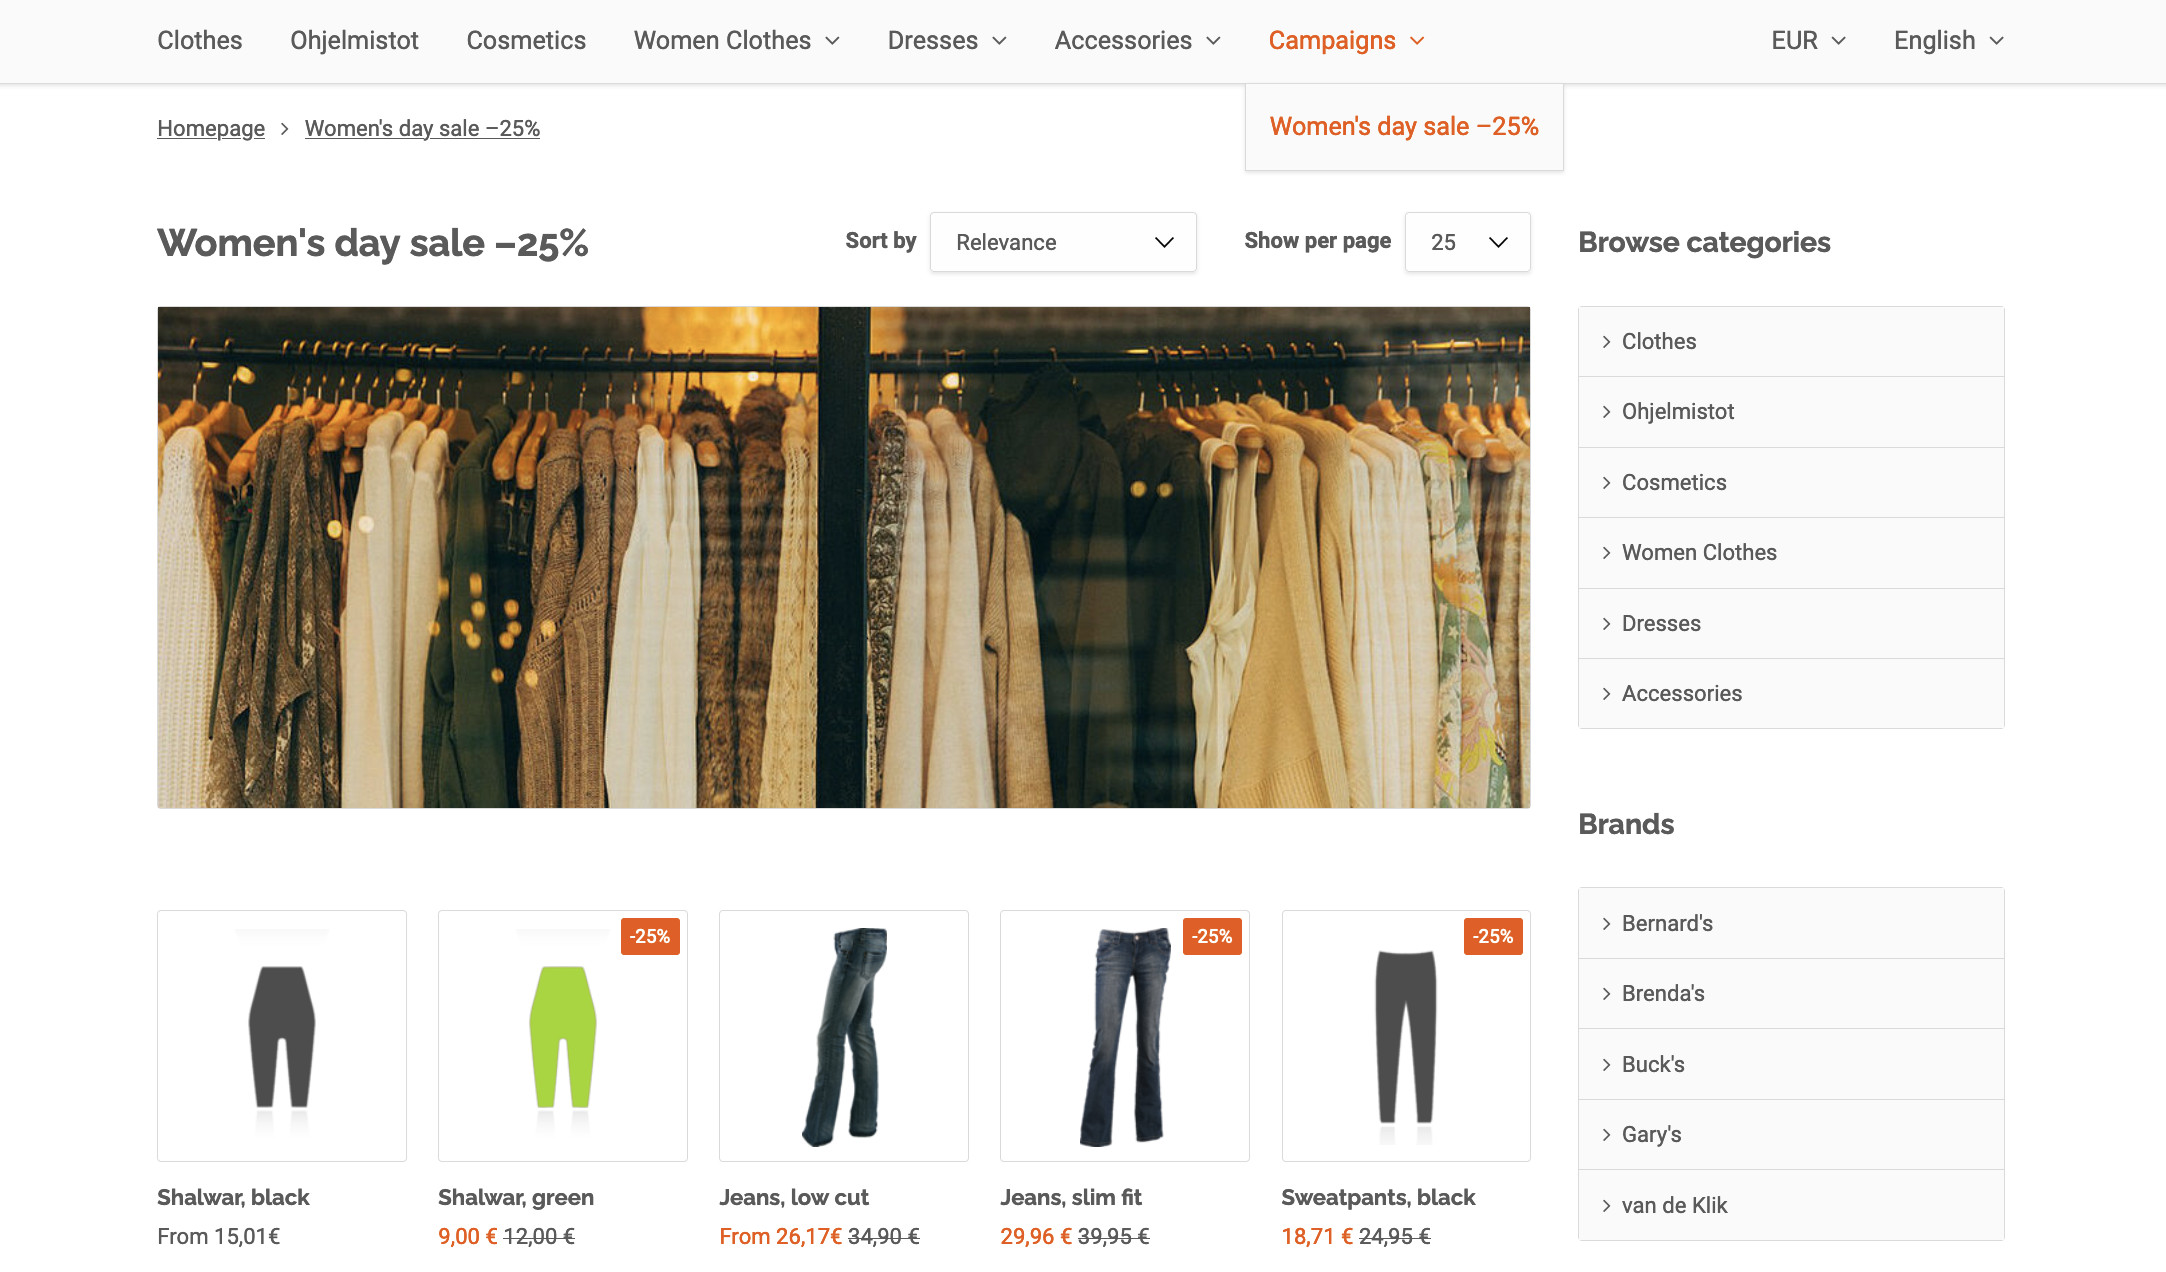
In the MyCashflow default theme, the campaign page showcases the campaign products as well as information about the campaign itself.
Even if the campaign doesn't have its own campaign page, the campaign products will have an indicator about the campaign when the campaign conditions are met.
When a customer orders a product at a campaign price, this information will be included in the shopping cart and at checkout. The campaign details are also included in the order details in the admin panel.
Creating and modifying campaigns
Creating campaigns
To create a new campaign:
If you selected Product discounts in the campaign form, add products to the campaign and set campaign prices for them.
Modifying the campaign settings
How to modify the settings of an existing campaign:
Settings in the campaign form
The campaign form allows you to specify the basic campaign information and set the terms and discounts when you create or modify a campaign. If you have the Web Designer extension enabled, you can also use the form to manage search engine optimization (SEO) and select an alternative template for your campaign.
Basic campaign settings
You can give your campaign a name, set basic settings for an active campaign, and create a campaign page.
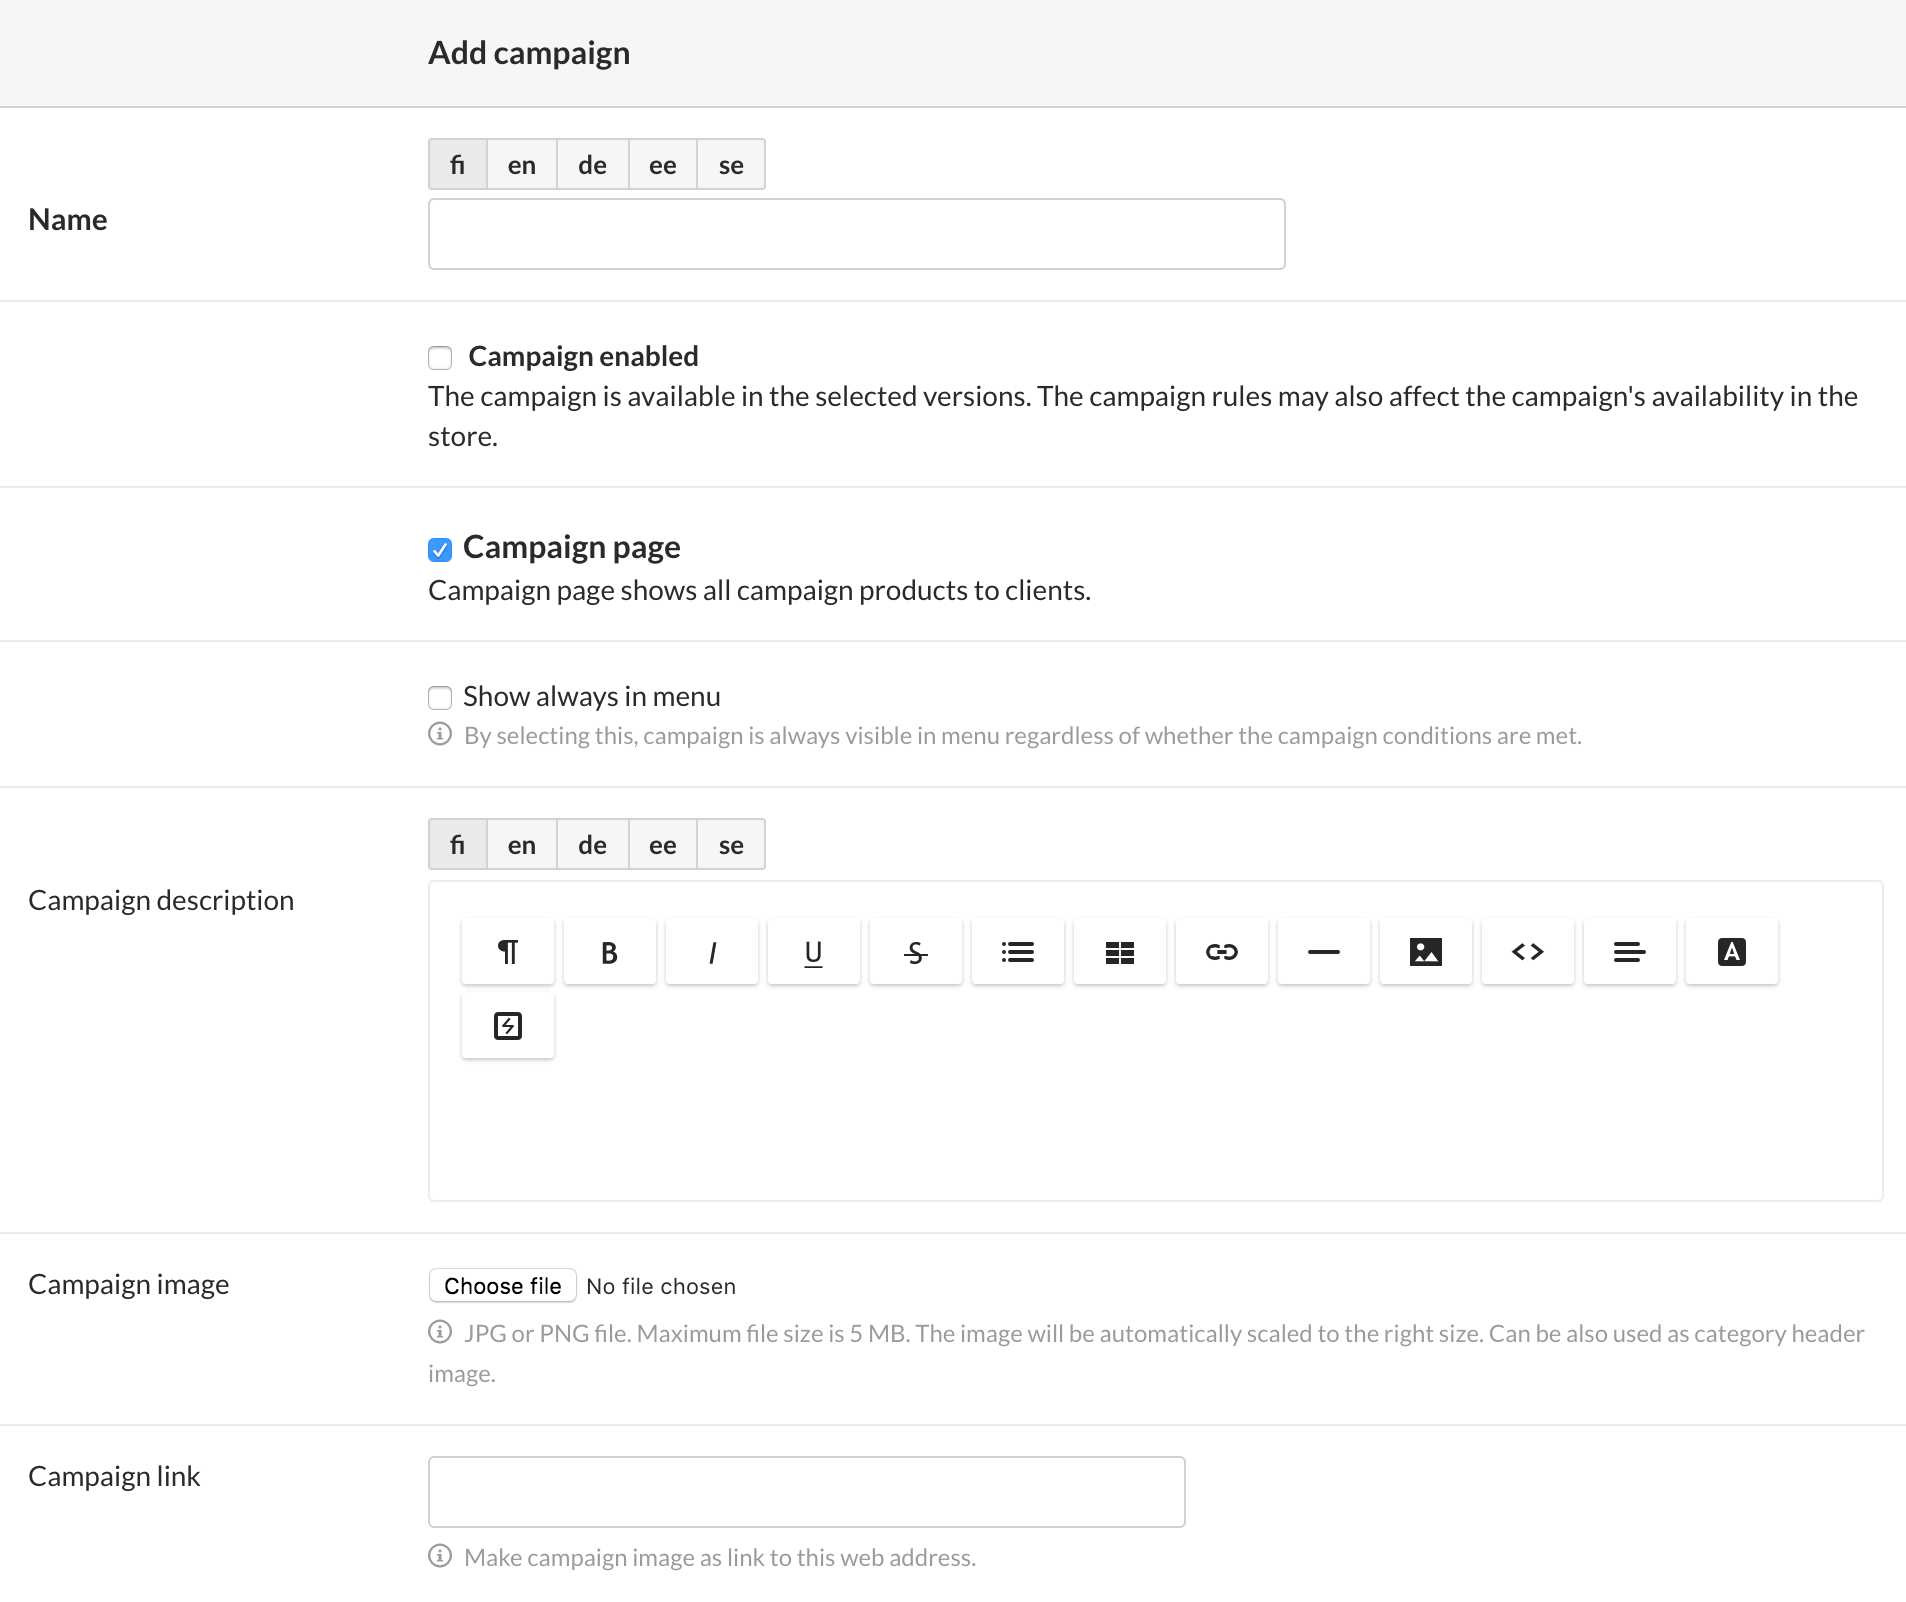
- Name: Enter a descriptive name for your campaign.
- Campaign enabled: When you mark a campaign as active, you can set its basic properties:

- Active in version: Select the store versions that your campaign applies to. If you don't select any store versions, the campaign won't be active.
- Publicly available campaign: If a product discount campaign is publicly available, it falls within the scope of the Omnibus Directive. With this setting, you ensure that the comparison prices required by the directive will be displayed in connection with discount prices.
Regardless of this setting, you can set conditions for the campaign to limit the discount to specific customer groups or require a campaign code.
- Campaign period: To set the start and end time of the campaign, click the calendar icon and select a date from the calendar menu. If necessary, you can change the default times (start time 00:00 and end time 23:59).
After expiring, the campaign will disappear both from the online store and the campaign list on the admin panel's page. You can browse expired campaigns by clicking the campaign list's Show all link.
Specifying a campaign period is required if the campaign is generally available. A campaign like this can last up to 60 days.
- Campaign page: This option allows you to create a separate page for a campaign with product discounts, which will be visible on your online store. In the MyCashflow default theme, the campaign page showcases the campaign products as well as information about the campaign itself. All active campaign pages are included in the online store's navigation bar.
If you decide to enable a campaign page, you'll be able to configure its advanced settings:

- Show always in menu: The campaign will still be visible in the online store after the validity period has expired until you delete or hide the campaign.
- Campaign description: The introduction you enter in the text field will be dispalyed above the product list on the campaign page when using the default theme. (You can also add content to the introduction by using Interface tags and the dictionary.)
- Campaign image: The image you specify will be shown as a banner on the campaign page when using the default theme.
- Campaign link: wrap the campaign image into a link which leads to a desired page in your online store or to an external destination.
Search engine optimization
If you have installed the Web Designer extension, in the Search Engine Optimisation section you can specify the document and page titles and meta description that will appear in search engine results. (Find out more about optimizing your MyCashflow online store for search engines)
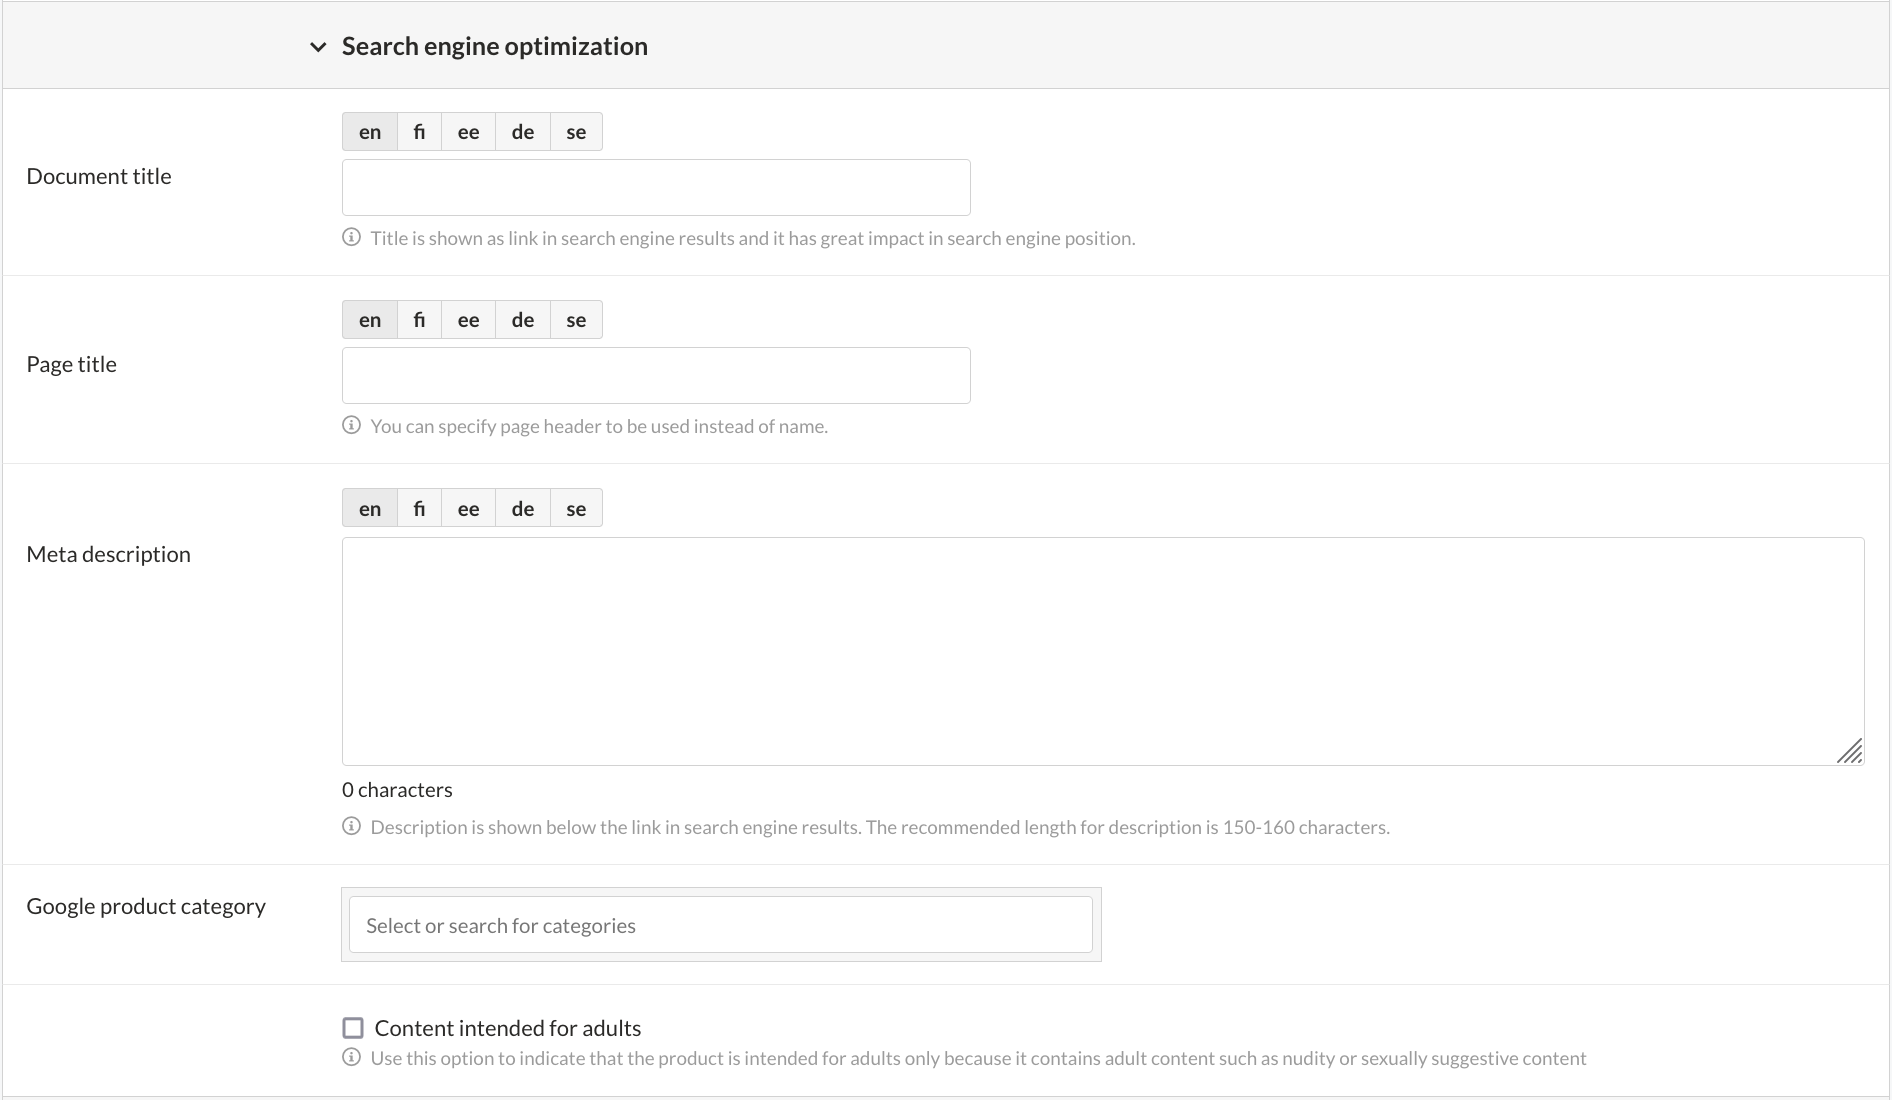
The page title serves as the content header on the online store's product page, while the document title is included in the tab label at the top of the browser window or below the address bar. If you leave the title empty, MyCashflow will use the product name as its substitute.
In addition to search engine optimisation, you can set a Google product category for product feeds or ads and, if necessary, mark the product as adult content.
Template file
If your online store has the Web Designer extension, you will also see the a Template file section on the form, where you can choose an alternative page template (if one is included in the store theme).
Learn more about creating custom templates.

Campaign rules
The campaign conditions define the circumstances under which the campaign discounts become available to customers. If you define multiple conditions, they will all have to be fulfilled for the discount to be awarded.
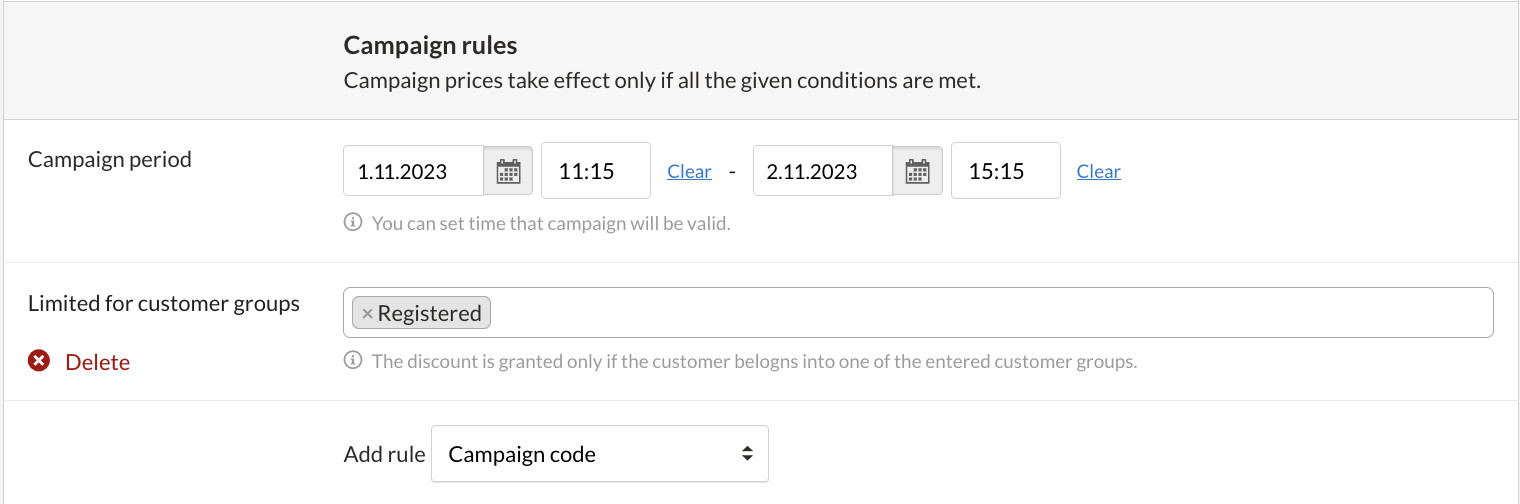
- Limited for customer groups: target a campaign at selected customer groups. When enabled, the campaign discounts will only apply to logged-in customers who belong to one of the selected customer groups.
- Campaign code: You can set a code that your customers should enter in order to obtain the campaign discounts (alternatively, you can also use discount coupons for the same purpose).
When using campaign codes, make sure that all codes are unique. Campaign codes cannot be identical with discount coupon codes either.
Campaign discounts
A campaign can have up to three discount types at a time: a discount row, product discounts and free shipping. You can see below how each of the different discount types works:

- Discount row: define a euro or percentage-based discount that can be applied either to the order total or only to order products. Read more about discount rows.
- Product discounts: you can define a discount percentage that will be applied to all campaign products. To round discount prices up or down, select the Round prices option.
If you select product discounts, you can also define quantity discounts for the products you choose (e.g., three pieces of product 'A' are sold at the joint price of €X).
Additionally, you can define an order limit for a product (e.g., a maximum of 3 pieces of a product can be ordered at the price of €X).
Read more about product and quantity discounts. See also the instructions on how to set prices for campaign products if you use product or quantity-based discounts.
You can also enable 100% discounts in your online store. If you would like to enable this feature in your online store, contact MyCashflow's customer service.
- Free shipping: you can set free shipping for orders that fulfill the campaign terms and conditions and which use one of the selected shipping methods.
You can set a minimum sum that the order total has to exceed in order to be able to qualify for the discount.
Free shipping for campaigns applies to all of your online store's products as long as the campaign's terms and conditions are met.
Read more about free delivery.
Creating various types of campaigns
This section discusses how you can offer customers various types of discounts by using campaigns.
Product discounts
The Product discounts campaign benefit allows you to define a discount price for the products that have been added to the campaign either according to the campaign's general discount percentage or on a product-by-product basis. On the online store, product discounts are displayed on the product cards of the products that are part of the campaign. You can also add a specific campaign page for them using the campaign form.
You can also give products quantity-based discounts.
Here's how to create a product discount campaign:
- To discount all products according to the discount defined in the campaign form, press the button.

To update the prices of the products that you have already priced, select the option Calculate prices for all products (override all prices).
The campaign products' prices will be calculated based on the discount percentage and updated in the product table.
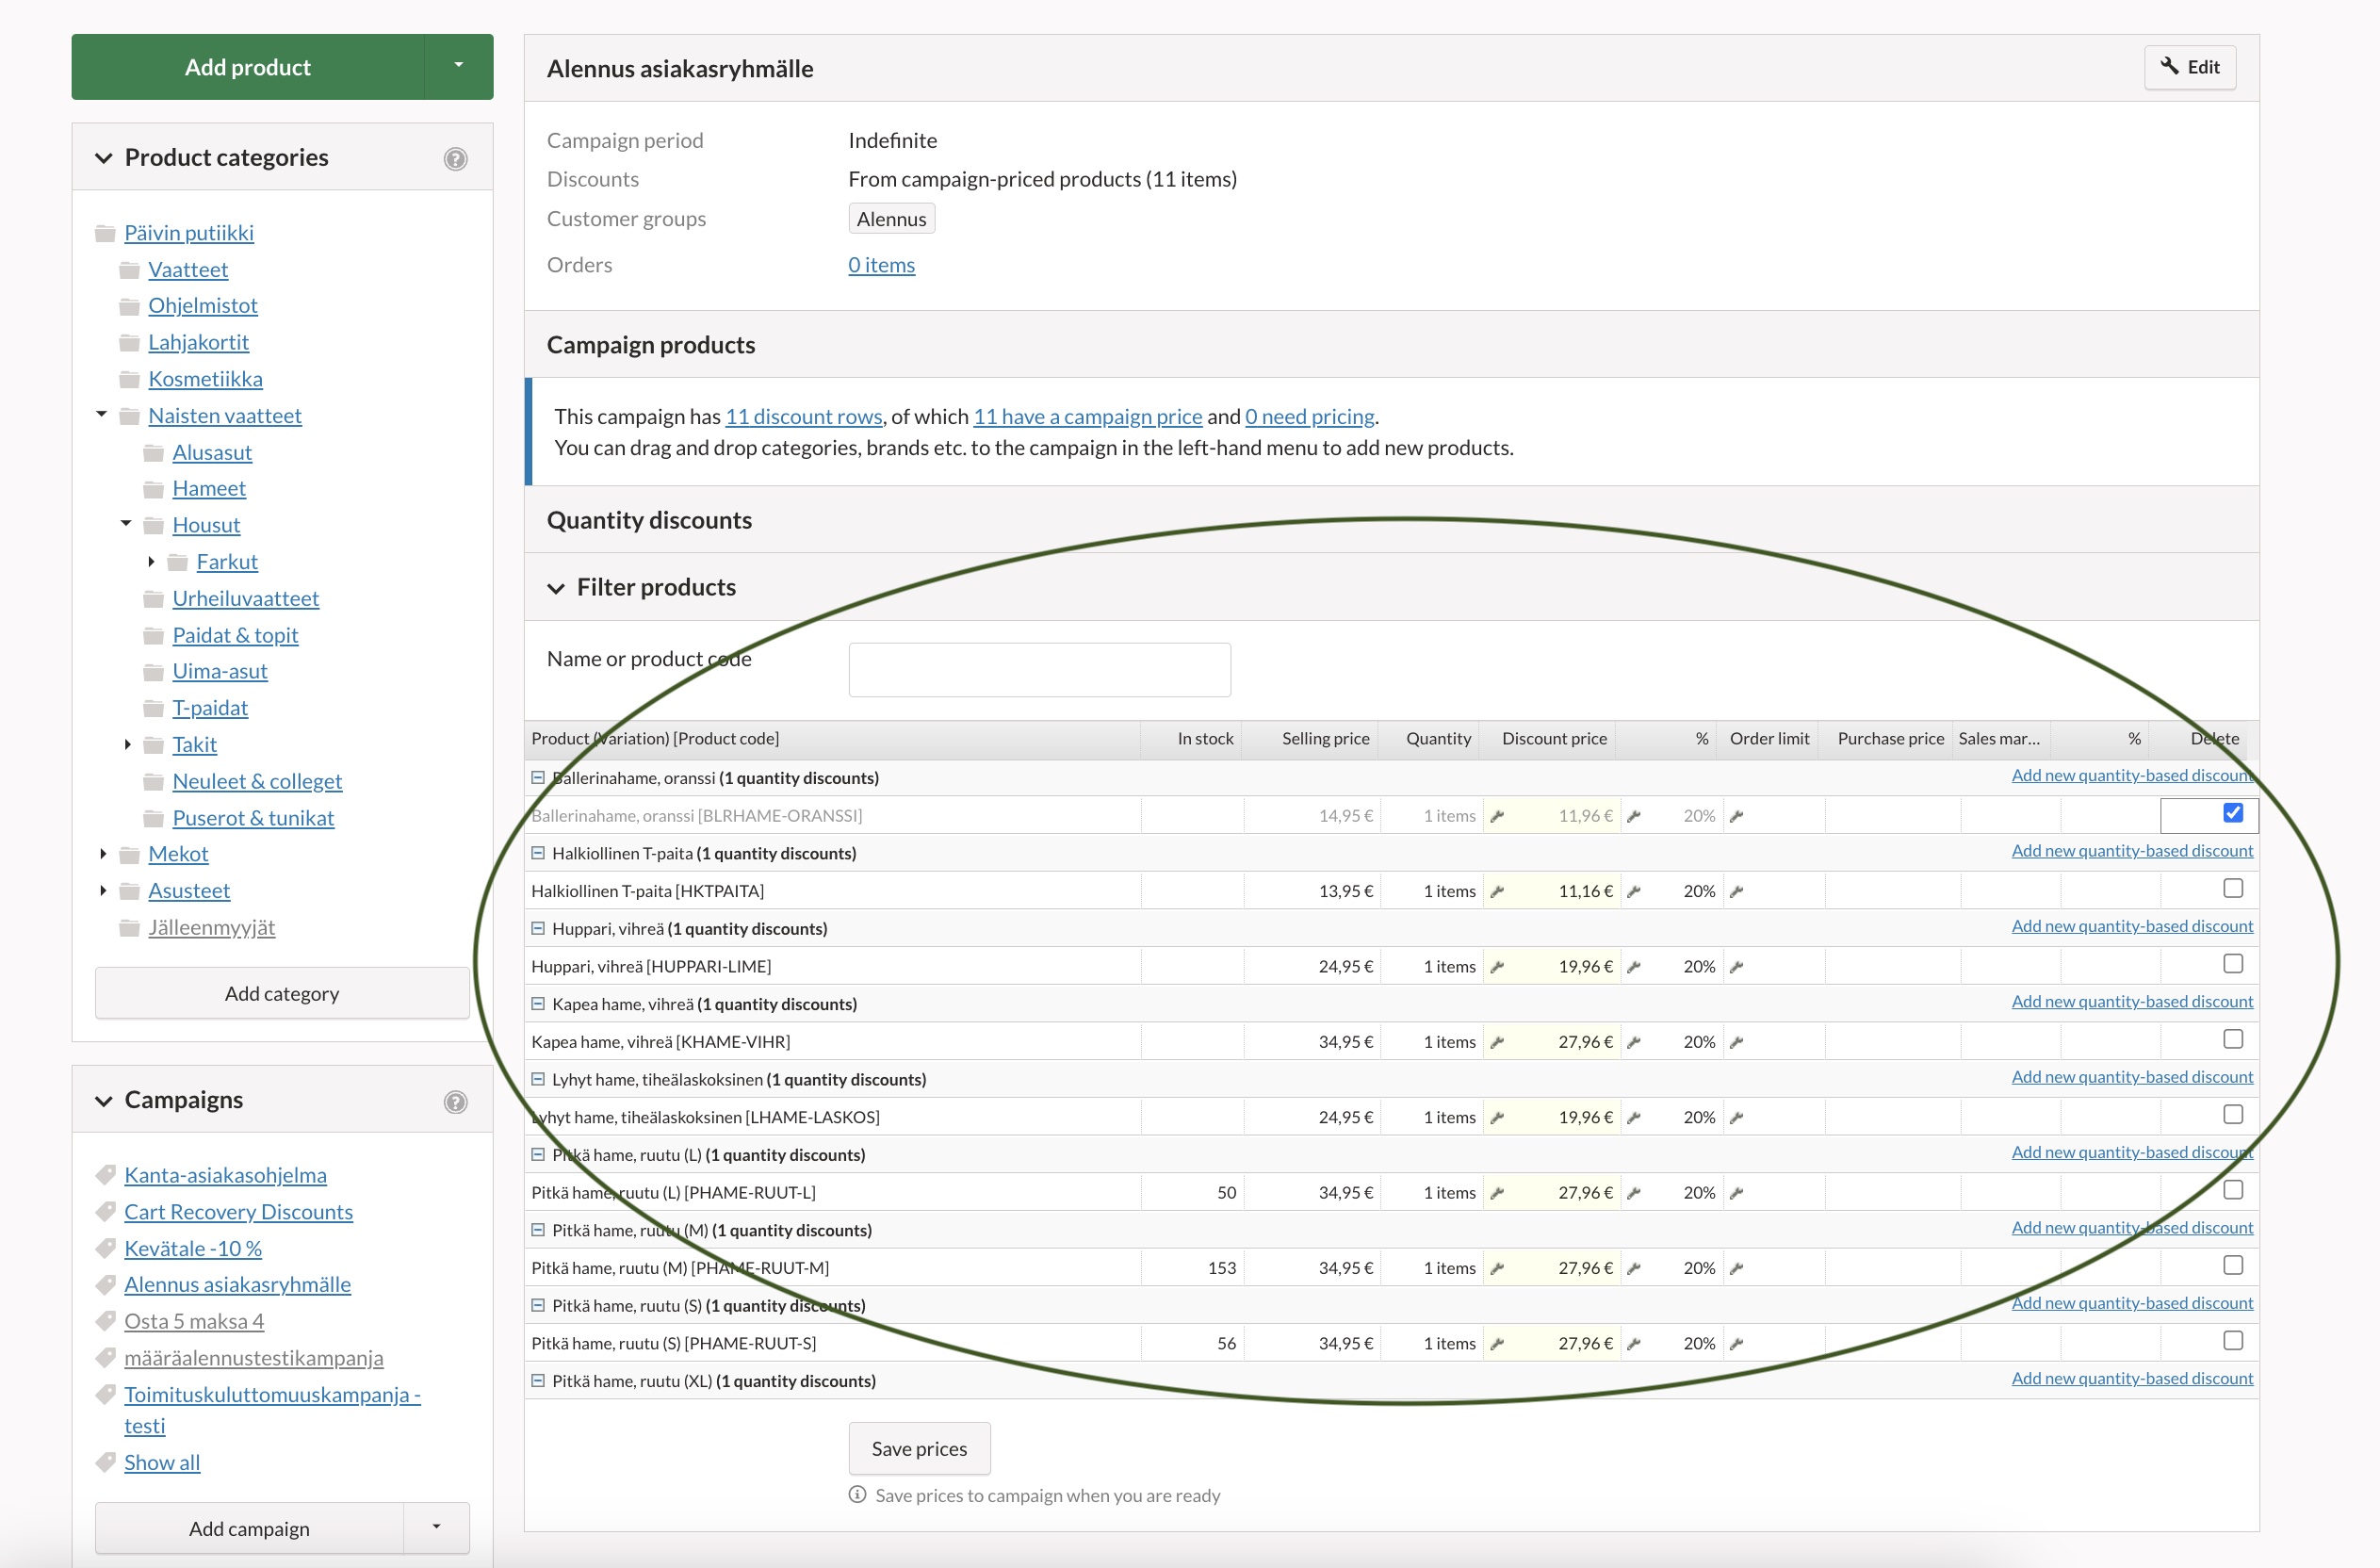
Quantity-based discounts
A quantity-based discount is a conditional type of product discount in which the customer gets a discount on a product that belongs to the campaign if he buys several items of it at one time. For instance, you can use quantity-based discounts to sell 3 shirts for €8 each.
You can also provide quantity-based discounts for different variations of a particular product.
Here's how to create a campaign with quantity-based discounts:
- Specify the number of products required for the discount the discounted price for them.
In the Quantity column, enter the product quantity that entitles a buyer to a discount.
Specify the discounted unit price for the product in euro in the Discount price column or the discount percentage in the % column.
In the order limit column, you can define the maximum order quantity for the product which the customer cannot exceed when placing an order.
The campaign order limit always takes precedence over the limits of individual products.

Quantity-based discounts for combined product variations
MyCashflow Customer Service can set up a feature in your online store free of charge, which allows you to grant a quantity discount when a customer purchases different variations of one product (e.g. 1 blue, 1 green and 1 red shirt with a 30% discount).
With MyCashflow's previous quantity-based discounts, you could award discounts only for multiple items of the same variation (e.g. a discount of 30% for purchasing 3 red shirts).
The discount applies only to variations that have no price of their own.
If the variation selected by the customer has its own price, it won't be counted towards the quantity that entitles to discount.
Creating quantity-based discounts
This is how you create a campaign where you grant discounted rates based on the number of product variations:
Discount rows
Using a discount row, you can set discounts as percentage or as a particular amount of money. The discount may apply to all the products included in the order or to campaign products you specify by using a saved product search.

You cannot add products by dragging and dropping them to a campaign that has discount row as the campaign benefit. You can only add products to the campaign by using a saved product search.
Here's how to create a discount row campaign:
- Specify whether the discount applies
- to paying for the entire order or
- to paying for products specified with a saved product search.

Free shipping
The Free shipping campaign benefit allows you to set free shipment for shipping methods of your choosing. You can also set a minimum order limit, which makes the shipment free of charge for the customer when exceeded.
The Free shipping benefit cannot be restricted to specific products. It applies to all the products that can be shipped by using the chosen shipping methods.
Here's how you can create a campaign with free shipping:
- Select the Shipping methods that the campaign applies to.

Determining products' discount prices
After you've created a campaign and added products to it, it's time to set the products' prices.
Update the campaign product pricing every time you have
- added new products to the campaign
- changed the selling prices or purchase prices of campaign products
- changed the campaign's discount percentage or discount type (product discounts vs. quantity discounts)
- The campaign discounts and discount coupons are applied to the order product first.
If the customer uses a coupon that gives a similar discount to the campaign (e.g., a discount on the total amount), only the higher discount will apply. For example, if there are both a campaign discount of 20% and a coupon discount of 25% on the total amount of the order, the campaign discount is irrelevant. However, if there is a product discount campaign accompanied by a coupon discount on the total amount of the order, both discounts will take effect.
- If you select both product discounts and a discount row as the discount types of a campaign, both discounts will take effect.
- After that the potential gift card discounts are taken into account.
If, after using the gift card, there is nothing left to pay, the customer doesn't have to select a payment method at all at checkout.
Comparison prices for product discount campaign
If a product discount campaign is publicly available, the lowest price at which the online store has marketed each discounted product during the previous 30 days shall be indicated. This means that in order for the product to be marketed at a discounted price, the price really has to be cheaper than before.
MyCashflow compares the discounted price to the product’s price history and automatically displays the comparison price in the online store when the campaign’s basic settings in the campaign form mark the campaign as publicly available. A campaign like this can last up to 60 days.
You can use the same comparison price for 60 consecutive days, even if the price falls gradually during the campaign. If you want to continue your discount campaign even longer, you need to create a new campaign, and the new comparison price will be the lowest price for the previous 30 days.
The requirement for comparison prices is based on the European Union Omnibus Directive, which aims to promote transparency in consumer marketing. Read more about the impact of the Omnibus Directive on the pricing of online stores (in Finnish).
If you set conditions for a product discount campaign, they may limit the availability of the campaign to such an extent that you do not need to provide comparison prices. The Omnibus Directive does not apply, for example, to a discount campaign for loyal customers, if the status of loyal customer is granted only to a selected group. In this case, you can remove the mark that the campaign is publicly available from the campaign form. (The situation is different, however, if one can register as a loyal customer freely, because then the discount campaign is practically available to anyone and falls within the scope of the Directive.)
Hiding and deleting campaigns
You can hide or delete discount campaigns from your online store at any time. If you're planning to reuse a campaign, you may want to hide it. But if you're not going to need the campaign anymore, you can delete it.
If you've defined a validity period for the discount campaign, it will automatically be hidden from your online store after the validity period has ended.
Hidden campaigns are not displayed to visitors to your online store. You can edit and publish old campaigns again at any time.
Hiding campaigns
To hide a campaign, use its visibility management in the campaign form:
- Start by opening the campaign from the left-hand Campaigns column of the page.The campaign view opens.

- In the Active in version item, deselect all the store versions in which the campaign should be hidden.

Deleting campaigns
If you delete a campaign, it will be deleted from your online store for good. Deletion cannot be canceled.
- In the campaign form, click the Delete link.

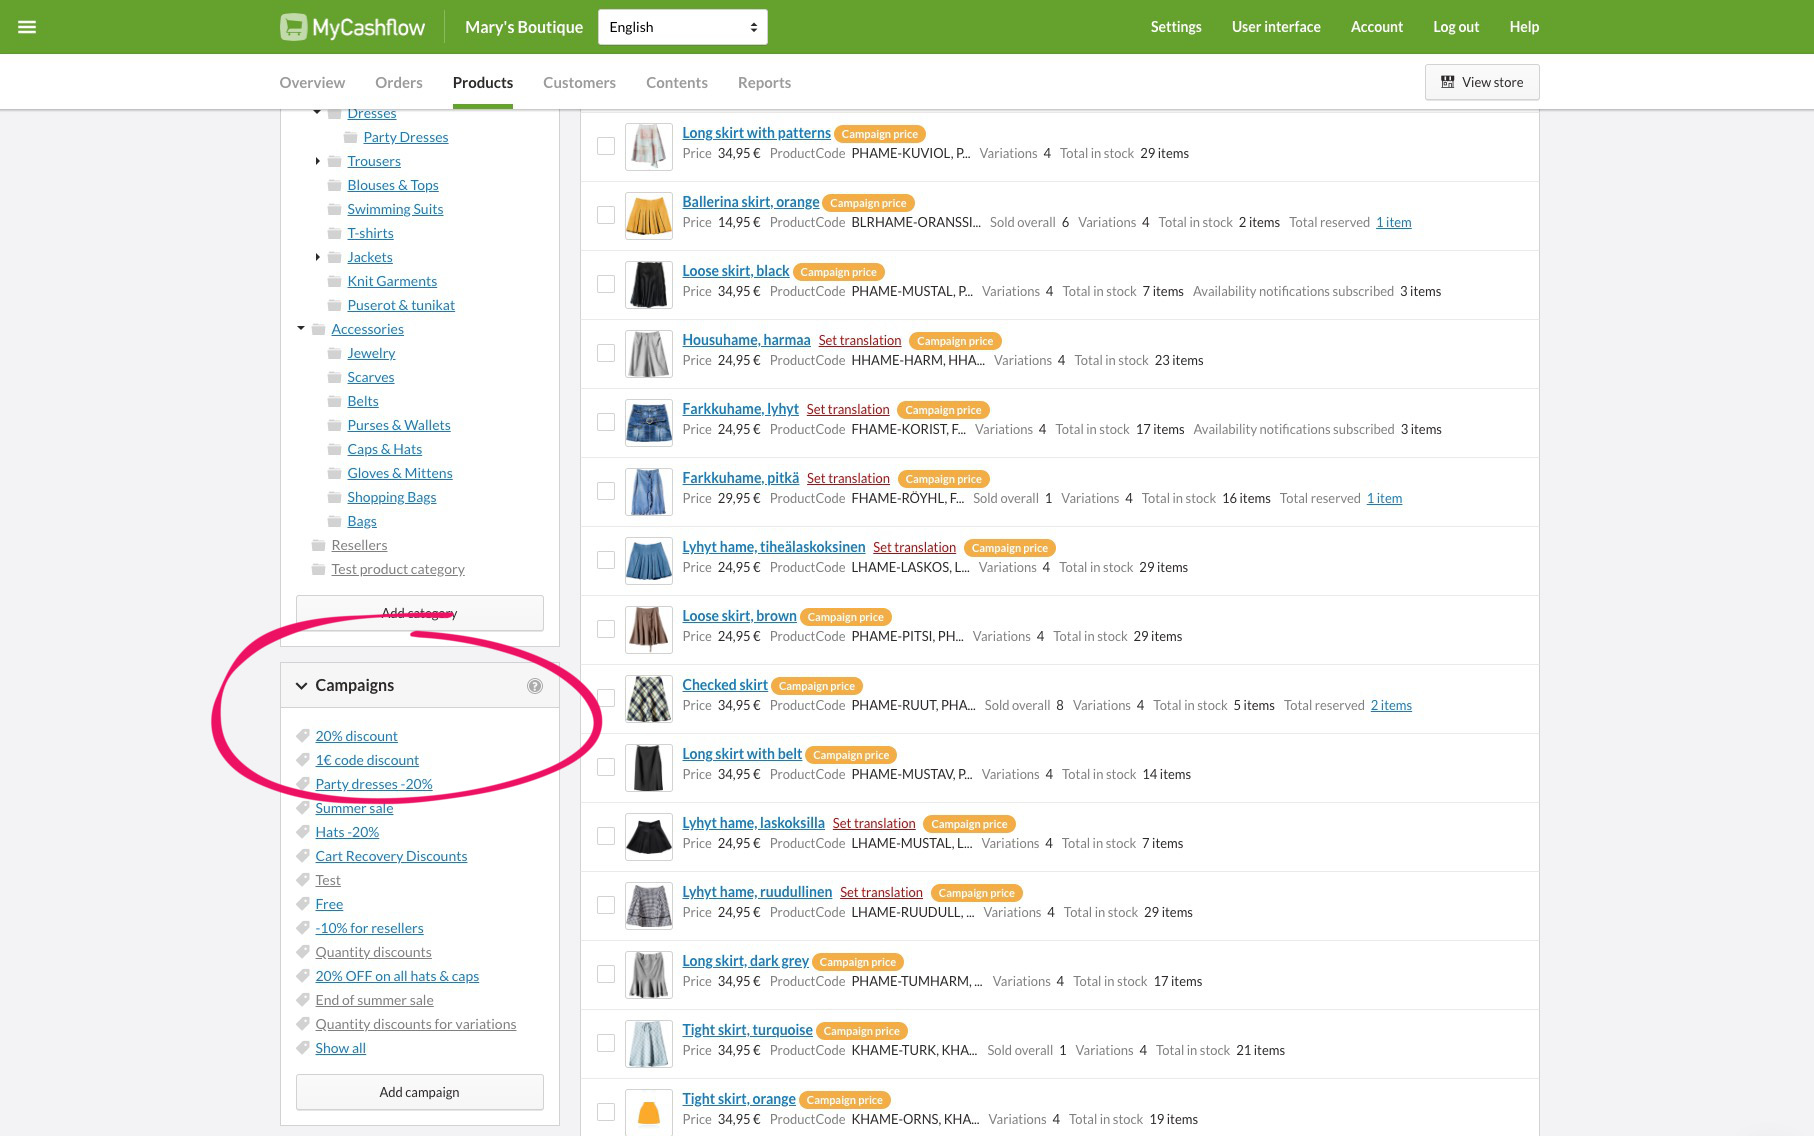
Adding products to campaigns
Learn here how to add products to discount campaigns.
You can add products to campaigns in three different ways on the page:
- By dragging individual products to campaigns
- By dragging product categories or brands to campaigns
- By dragging saved searches to campaigns.
Additionally, you can add a product to a campaign on the product form or in the product card. See detailed instructions.
Make sure that you set campaign prices for products anytime you add them to a campaign.
A product can belong to multiple campaigns at a time, but only the greatest discount will be given to the customer when purchasing the product.
Sorting products manually is not possible in campaigns. In the store theme's campaign page template, products can be set to be printed either sorted by name or price.
Adding individual products to campaigns
- Grab the
 icon on the left side of the row. The icon becomes visible when you hold the pointer over the row.
 - Drag the row to the desired campaign on the campaign list in the left-hand pane of the page.

You can also add a product to campaigns in the product card or on the product form:
Product card
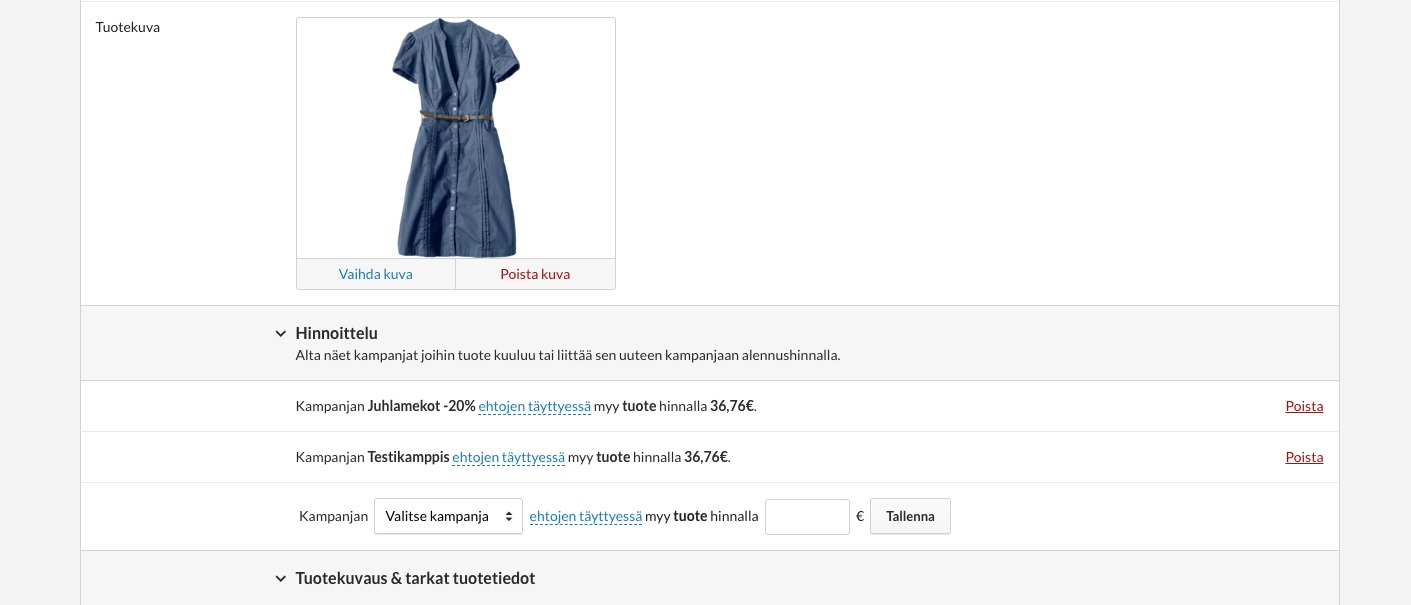
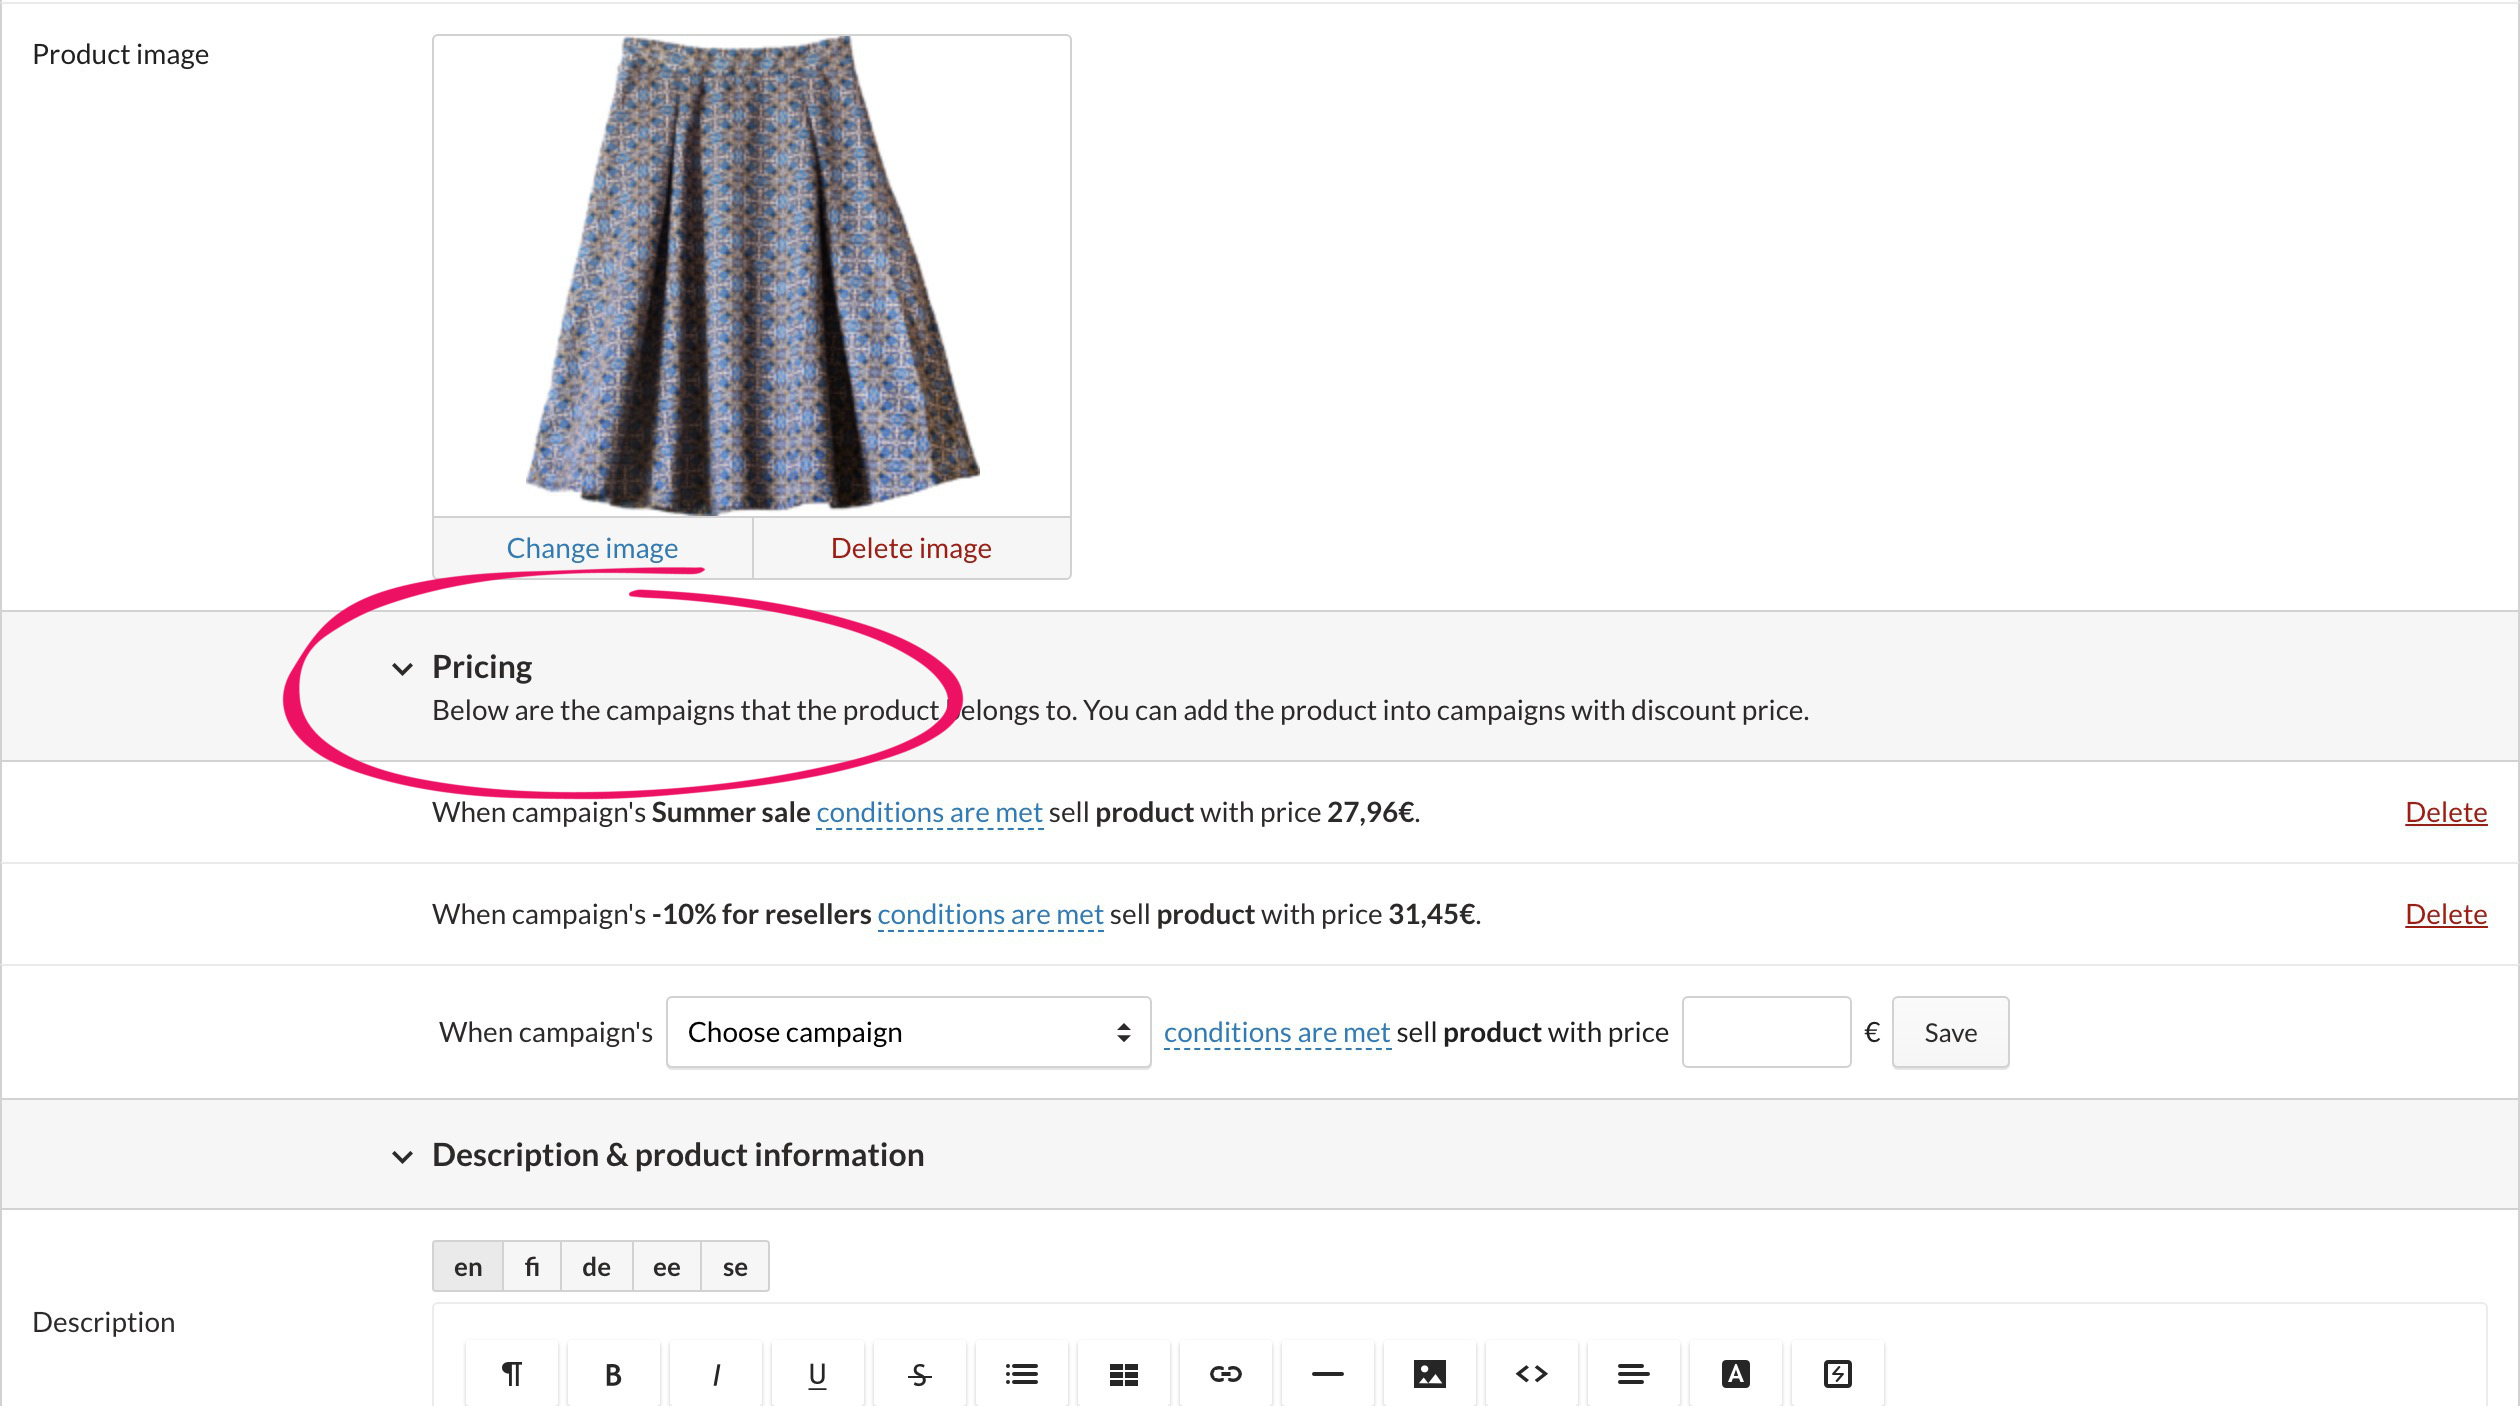
You can add a product to a campaign in the product card's Pricing tab.

You can also define the product's individual price for the campaign. To use the campaign's general discount option, leave this field empty.
Make sure that you set campaign prices for products anytime you add them to a campaign.
Product form
You can add a product to a campaign via the product form while adding or editing the product.
Select the desired campaign via the product form's Pricing section.
You can also define the product's individual price for the campaign. To use the campaign's general discount option, leave this field empty.
Adding products based on product categories and brands
You can also add to campaigns complete product categories and brands. If you don't want to add all of the product category's products or the brand's products, you can use either a saved search or remove the selected products from the campaign.
- On the left side on the page, grab the icon on the desired row on the list.
- In the case of product categories

- In the case of brands

- In the case of product categories
- Drag the row onto the desired campaign on the campaign list in the left-hand pane.

Adding products based on saved searches
If you'd like to add multiple products to campaigns based on different criteria, saved searches are going to make your job much easier.
- Drag the saved search onto the desired campaign on the left-hand campaign list.
Products returned by the search have been added to the campaign.
If there is any change in products that have been returned by the saved search, the campaign won't automatically reflect these changes.
The saved search will have to be added to the campaign once again, so that the campaign's products can be updated.
Removing products from campaigns
You can remove products from campaigns through
You can remove products from campaigns through the campaign details that you access via the left-hand menu on the page.
To remove product lines from a campaign, select the relevant product lines, and click below the product table.
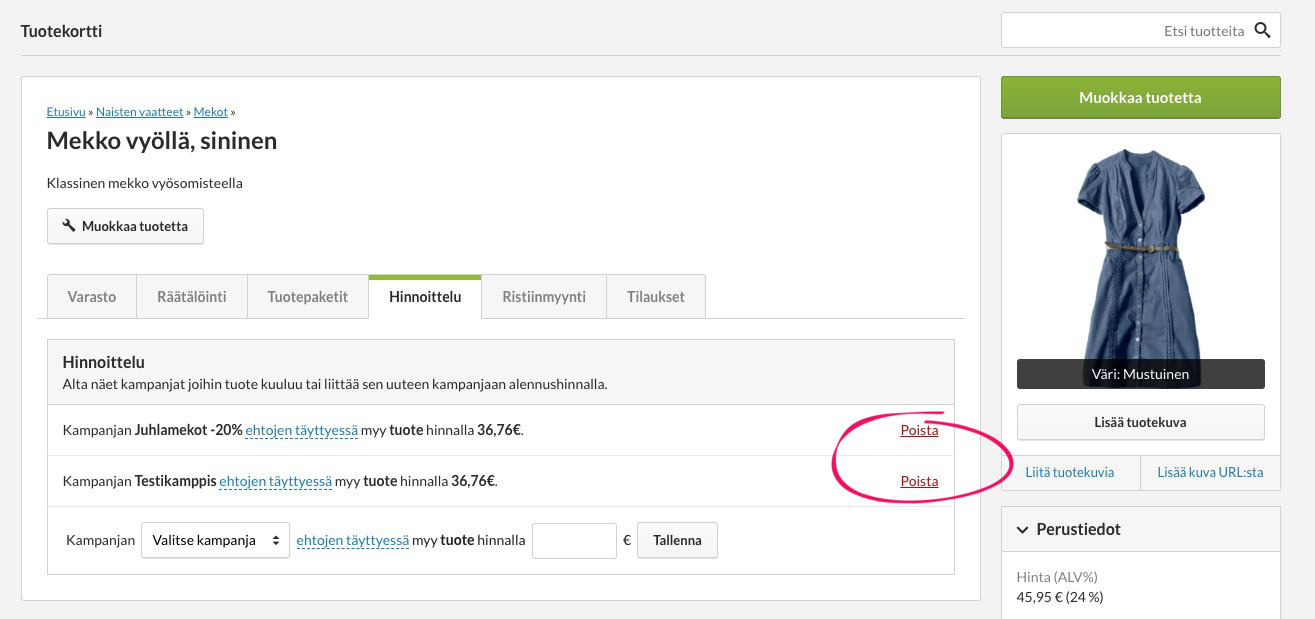
You can remove products from campaigns through the product form while editing product details.
In the product form's Pricing section, you can see all the campaigns that the product belongs to, and you can remove a product from a campaign by clicking the Delete link next to it.